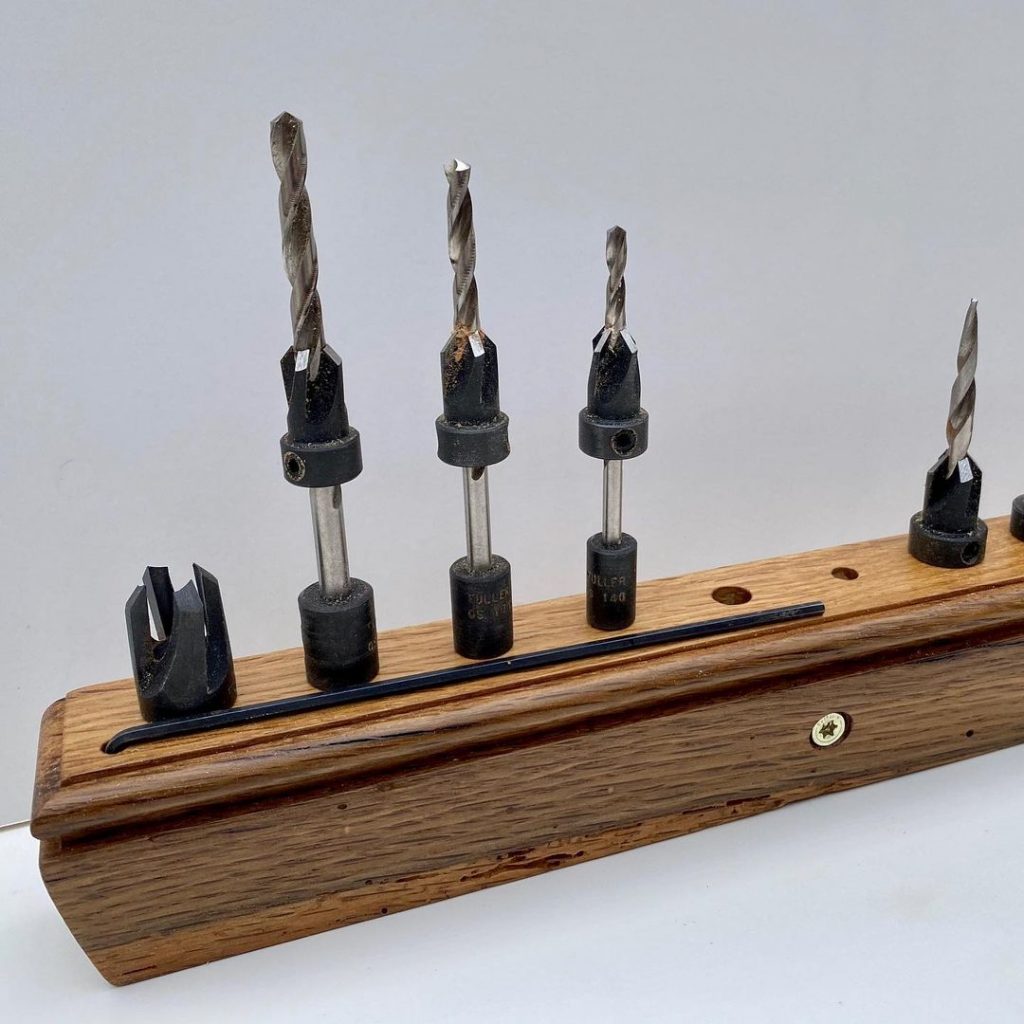
This is the business end of the drill, it is what does the work, and it makes a hole. Mankind has been drilling holes in wood from the stone age on. This discussion will concentrate on the types of drill bits used in North American woodworking in the nineteenth century. Some of the designs used in the nineteenth century were originally developed hundreds of years before, others were created in that century. As technology advanced some of these designs became obsolete but some have endured because of their great design. As with all cutting tools, bits need to be sharp and clean to operate properly. A bright bit works much better than one that is dull from rusting or pitting. While it is not advisable to remove all pitting, all rust must be removed and the surfaces polished bright. The bit goes easier into the wood and the chips come out better when the bit is bright. Lubricating the drill with wax or grease helps when drilling difficult wood. If it is used for dowels or pegs excess lubricant can cause problems with glue, so use it sparingly. Take care when using these old bits, the steel is not as hard as modern materials and the bits can be distorted if excessive force is used. An old term for a drill or drilling device or the drilling itself is ‘wimble’.
The advantage of drilling by hand rather than using high-speed modern bits, which produce perfect smooth holes, is the fact that a hand drill will actually push some of the wood out of the way as it makes the hole. This can be particularly useful when making chairs. When the tenon of a leg or stretcher is glued into the hole the wood that was pushed out of the way will swell back up producing a much tighter joint.
- Button Bit – The button bit while not necessarily a woodworking tool is a variation of the center bit. Instead of a blade to cut wood away, these were made to scrape bone, horn, antler, ivory or mother of pearl into buttons. The center bit is used to give the button bit a place to revolve around, the spur is used to delineated the size of the button and the metal in between is shaped in the reverse profile of the button. As it is turned it creates a shape into the thin material and after it has finished scraping the shape, the outside spur frees the material and the button is formed. Drilling from both sides will make buttons that are reversible. Early buttons will frequently have a center hole. Button makers will use bits with little or no center spur and must be held with a guide to prevent walking, but will produce buttons without a center hole. This work is best done underwater to control the nasty dust created from some of these materials.
- Center Bit – Perhaps one of the more common bits of the nineteenth century this bit resembles a modern spade or butterfly bit, which is where they got the idea. This bit produces a very smooth entry hole, is used for shallow drilling because of the tendency of the bit to drift during drilling. The bit has a center spur that orients the bit and prevents walking, on one side of the flat bit is a spur that scores the wood prior to the opposite side removing it as it follows around. The other side has a lip bent out and sharpened producing an angled cutting edge that easily removes the previously scored wood. These bits require much less metal to make than twist bits and were not as expensive to manufacture. Most center bits are not very long and were not intended for deep holes nor are they recommended for dowels or pegs. The center spur needs to be sharp as does the scoring spur. The scoring spur is flat on the outside and beveled on the inside, do not excessively sharpen the outside of the spur or the bit will bind. The cutting lip should be sharpened like a chisel or plane iron, the bottom flat (or at an angle) and the bevel on top is where the sharpening should be concentrated.
- Counter Bore Bit – This is a variation of the center bit and is used to drill a larger hole in a previously drilled hole. It is difficult to drill a larger hole in a smaller hole and keep the larger hole centered. This is used to counter bore a hole for something like the head of a bolt. The bit looks like a center bit but instead of a center spur there is a cylinder of metal that is meant to go into the previously drilled hole and guide the bit to cut a larger hole. Instead of pivoting on the center spur, the bit pivots on the cylinder that bears on the sides of the hole. This type of bit is invaluable when this special purpose hole is required. It is difficult to drill a larger hole in a pre-existing smaller hole, usually the large hole is drilled first and the smaller hole is then drilled in the center of the larger hole. When the need arises and you do not have the proper counter bore bit, placing a dowel in the hole to give the spur a place to pivot allowing a center bit to drill the larger hole. The center bit then either pushes the dowel out of the way or drills it away.
- Gimlet Bit – This is perhaps my favorite drill bit and a pervasive drill bit in the nineteenth century. They are shaped like a cigar with a twist. Pointed on the end, the bit widens to a taper and opens up like an open pea pod and the edge cuts all the way to the maximum diameter and then it tapers back in to the shank. One advantage of this bit is that it has a long cutting edge, unfortunately it tends to split out during the entry cut but the exit hole is very clean as the bit pulls the wood up and in as it cuts rather than splitting out. Care must be used when drilling with small sizes of this drill bit as the walls are thin and excessive force can untwist, bend or distort the gimlet bit. Some gimlet bits have a thicker tip to provide more material for strength and sharpening and some have threads filed into the outside tip to help the bit enter and advance into the wood. Because of the shape of this bit it can tend to split out wood because of the pointed wedge shape of the bit. Do the sharpening on the inside of the bit, make sure that the outside is flat and smooth and sharpen the bit on the inside from the tip up to where the bit is widest as that is all of the area that does the actual cutting. A round file is useful for sharpening.
5.Gouge Bit – This bit gets its name because it looks like a gouge. A round cylinder of metal that is smooth on the outside and hollow on the inside, a trough that is sharpened on its leading edge like an in cannel gouge, sharpened on the inside. This bit requires a starting hole or depression to start drilling and will produce a fairly clean entry cut but tends to split out on the backside. A block of wood with a hole the same size as the gouge bit can be clamped to the work and this provides a guide for the gouge bit to begin drilling. The gouge bit is sharpened on the bottom edge only, if the sides are sharp they will tend to enlarge the hole as the drill advances. Because it is not tapered it does not tend to split the wood. Sometimes referred to as a Shell Bit.
- Nose Auger – This bit is similar to the spoon or gouge bit with the exception of a lip formed on the leading edge. Also called a down cutting auger, this bit is excellent for end grain drilling as it does not tend to drift as it is drilling, it is also good for pegs or dowels. The lip provides a low angle cutting edge that does the cutting and the shape of the body keeps the bit drilling straight. Sharpened like a gouge or spoon bit so that the only cutting edge is at the bottom, in the case of the nose auger, the lip is sharpened. Flatten the bottom side and do the sharpening on the inside.
- Pod Auger – This bit is just like a gimlet bit but does not have a twist. It is also like a spoon bit except that it goes to a point, some of these points have threads filed in their leading edge to aid the wood in starting and advancing into the wood. These bits are sharpened like gimlet bits only sharpening to the widest point of the drill bit.
- Quill Bits – While there is some discussion as to the various names applied to drill bits, this group of bits have a shape of a quill, the support structure of a feather. Quill bits are round cylinders with one or more flutes running parallel with the shaft of the bit. These actually scrape rather than cut the holes. Double flutes are made to be used in either direction or both directions. Sometimes they are not flutes at all but merely flat areas ground on one or more sides of the cylinder and the sharp intersection of the flat and round surfaces form the cutting edge. Some quills are made of flat metal with a dull point and both sides of the metal do the cutting. These flat quills are limited to thin bits as they cannot take the pressure of trying to grind or scrape a very large hole. Quill bits have no fancy sharpening techniques, the outside should be smooth and the flute or flat side is where the sharpening is accomplished. Flat quills are sharpened by squaring the edges.
- Spoon Bit – The spoon bit is similar to a gouge bit with the exception that the end is turned up like the lip of a spoon. Some gouge bits started out as spoon bits and the lip was just sharpened away. This bit leaves a distinctive round bottom hole. Because this bit does not have a centering spur, it can tend to walk over the surface. A small depression made with another tool aids in the spoon bit’s starting drilling. Because of the shape of these bits they are excellent for dowels or pegs in that their design helps produce a smooth straight hole. This bit can cause splitting on the backside when drilling completely through a piece of wood. Sharpen spoon bits from the tip up both sides of the hollow to the widest part of the drill bit, sharpening up the sides can cause problems by enlarging the initial hole as the rest of the hole is being drilled.
Twist Bits – The twist bit as we know it today, not the modern metal cutting twist bits used in woodworking today, these bits were formed by twisting flat metal into a twisted cylinder that evacuates chips as it makes them. 10. Hollow twist bits formed by shaping a round rod around a mandrel with a cutting edge on the end were developed earlier, but the design of the Frenchman L’Hommideau of the first decade of the nineteenth century is the basic design from which modern twist bits are derived, the double fluted twist, #11. Jennings improvement in the middle of that century (1855) is the twist bits we use today, #12. The solid center single flute double-spurred cutter called the Irwin Pattern appears as early as 1884, #13. These are the twist bits that have spurs projecting down in the same direction as the center spur or screw. Earlier versions prior to Russell Jennings improvement had the spurs formed on the topside towards the shank. See Detail #11 & #12. Larger versions of this bit frequently have a permanently attached T handle and is used for building and ship construction. Smaller versions with square tapered shanks are used in the brace to drill straight holes with smooth sides. The older the twist bit the slower the twist, in other words there are fewer twists per inch than newer versions of this classic bit. The advantage of this design is that the chips that the drill makes are evacuated from the hole with the twist of the body of the drill. The straight cylinder shape insures that the hole is drilled straight. The early versions had a center spur for locating the drill on the board to prevent it from walking as it cuts. Threaded center screws were a later development and would pull the bit into the wood. Coarse threads for softwood and fine threads for hardwood. The outside spurs were on the inside of the cutting edge, in other words they were bent back towards the shank and smoothed the sides of the cut. Later the spurs were put on the other side and would score the wood first before the leading (cutting) edge engages the wood. This produces a smoother entry hole without splitting like the earlier versions tended to do. When sharpening the outside of the spur should be flat and even with the outside of the bit and the sharpening (major metal removal) done on the inside, the spur needs to be sharp along its front and top edge. The cutting edge should be flattened on the bottom and the sharpening done on the inside. This needs to be sharp from the center spur or screw to the outside edge. Some bits have solid center spurs, others are threaded, course for softwood and fine threads for hardwoods.
These traditional drill bits live distinctive holes especially at the bottom of the hole. This can be useful when trying to determine the date of an artifact’s construction. For more information about drilling, boring, making holes, etc.